There are numerous reasons why parents may desire to relocate a trampoline. You might be looking at a new landscaping plan for your backyard. You may be relocating to a larger home to accommodate your growing family. Relocating the trampoline may also be necessary in some circumstances to make way for a new playset. Have we mentioned how knowledgeable we are about playsets?
As a father who enjoys redoing the yard on occasion, I can assure you that there will be numerous reasons to deconstruct and move a trampoline. You can relocate a trampoline without dismantling it, but you risk destroying the set.
At first appearance, removing a trampoline may appear difficult. However, it is not as difficult as it appears. With that in mind, here’s a detailed step-by-step guide to disassembling a trampoline for transport.
Table of Contents
Tools and Materials Required for Trampoline Disassembly
When you buy a brand new trampoline, the box will most likely include some specialized tools. These tools will be used for installation and some will be required to properly uninstall the trampoline.
Before attempting to disassemble your child’s trampoline, make sure you have the necessary tools:
- A spanner
- A spring extractor
- A screwdriver is required.
- A cordless drill
- Gloves
The spring puller’s principal function is to make it easier to remove springs. It can also be beneficial while attempting to remove the trampoline’s anchors during disassembly. While measuring the springs, use a spring puller to assure precision.
A trampoline also comes with screws as well as nuts to keep it stable while your children jump on it. The screwdriver and wrench are the playset’s dedicated tools for disassembling bolts and screws. While disassembling the trampoline, wear gloves to protect your hands. Gloves will also allow you to work confidently, knowing that you are completely safe.
It takes time to disassemble a trampoline. This procedure will most likely take approximately an hour, so planning in on the weekend would be better.
Clean the Trampoline
It’s natural for your child’s trampoline to collect dirt from many sources over time. The removal of a trampoline might be made more difficult by dirt. I recommend cleaning the trampoline prior to disassembling it. In many circumstances, a clean washcloth and water will suffice.
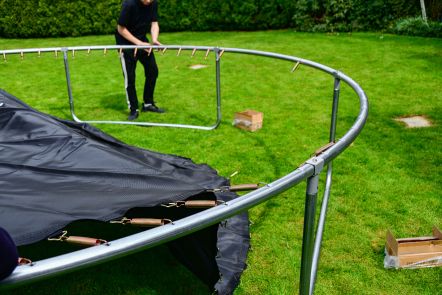
Remove Trampoline Nets
Regardless of trampoline type, removing trampoline nets is the same technique. Begin by removing the playhouse, tent, and any other items that are impeding your access to the nets.
Most safety nets include poles. Separate the safety netting from the poles while removing them. If these rods are attached to the trampoline structure, begin by removing them. To remove the poles, you’ll almost always need a power tool or a screwdriver.
Take out all of the poles and place them on the ground. You may also have to loosen the netting at the bottom in some circumstances. You can easily remove the nets from the poles after untying them. Keep your screws safe if your pole has them. To reassemble the trampoline, you’ll need the screws.
Take Off Safety Padding
Most safety padding is simply knotted on, so all you need to do is take on your old sailor hat and undo those faded knots. After removing the safety net, we recommend removing the safety padding.
The safety padding features knots that are normally located beneath the trampoline. It may take some bending, but you must undo the threads under the trampoline. If you find it difficult to loosen a knot with your bare hands, consider using a screwdriver.
Remove The Springs
The first step is to inspect the trampoline springs. A spring in excellent condition is removed differently from a damaged or worn spring. Also, check to see if the springs are rusted, as removing them requires a different procedure.
If you’re happy with the state of the springs, here’s how to securely remove them.
- Take a close look at the spring hooks that go into the bottom of the trampoline. The tip of the nut connects to the end of the elastic, and the end of the elastic usually has a V- or a D- ring that attaches to the end of the elastic.
- Just keep pulling the lever until it is fully extended. Then, pull the trigger and start pulling the lever.
- Now, after you hook the corresponding spring, you are ready to get the entire spring out of the trampoline.
- If the top spring is still attached to something, unhook it and slide it under the V- or D-ring to loosen it.
- Use essentially the same method to unlatch the other springs. Skip over every 3 springs and divide the spring force equally among the springs.
- In many cases, unhooking one spring allows you to unhook other springs to free them. Simply lift off the spring that you wish to unhook and it will unhook the rest.
- It only takes a few seconds to unhook the end of one spring and start to take off the springs.
Fold The Trampoline Mats
You probably already unhooked all of the spring systems. There is now just the frame and the mat. You can just keep it dry by folding it and keeping it in a dry place.
Disassemble the Trampoline Frame
If it is the case that you put together a trampoline before, disassembling it is basically the opposite of that process. This is a tedious process because there are lots of screws that you need to unscrew. You will need a screwdriver for this.
When you are dismantling a frame for a trampoline, a very strong screwdriver is the best tool to use. If you are a bit more handy and have a drill handy, you will have more time to do this task. Also, you will need to use WD-40 or a similar lubricating agent to keep the screws from sticking (even rusting).
Once you have removed all the nuts and bolts, just unplug each leg and remove the bands. The feet on the trampoline are very, very strong, and you should not let them drop onto anything. You want to work your back and forth across the entire trampoline, so that the weight is dispersed equally. Do not just cross posts and go to another one.
When you remove the four legs, remove the rings that hold the ropes in place. Twistable rings can be formed by twisting the inner rings and pulling out the t-joints. Then, put them in boxes that are specifically designed for that purpose.
